


Hello M’Darlin’s
Thank you for the super helpful feedback on last weeks post, I feel so excited to create some content that you’ve asked for and some of the answers were actually really surprising to me so that’s great to know. It often feels a bit strange as I honestly just waffle on each week and assume that no one is actually reading so I’m always delighted to hear that there are posts you enjoy or find useful. I’ve got a HUGE list of ideas now that I’m going to work through each week and if you ever want me to focus on anything then do let me know and I can add it to my list.
Luckily ‘Interior Design’ was one of the most popular selections from last week and since I was always going to tell you about my office makeover I’m very relieved haha… I was planning on a big post about the whole makeover but there’s so much info about the wall itself that I’ve decided to split it into two posts, this week is the leopard Print wall How-To and next week is the Make Over (because we all love a before and after picture!)
AD | Gifted: Dulux kindly gifted me all the paint I used to paint my Leopard Wall which I wanted to mention before I get going. I was going to use their paint anyway but when they offered to gift it I thought ‘winning’ so that’s that.
Step into my Office…
So we moved into the new studio back in October last year and what with Arm-agedon and it launching straight into Christmas we basically slapped a layer of white paint on every wall (to get rid of the rather offensive ‘Apple White’) Dumped everything on shelves and got stuck into Christmas mania. Since then, it’s been an incredible year with your support and orders and new kits etc it’s been an amazing whirlwind. So when it started to slow down in March it was the first time I really managed to catch my breath and look around and realise ‘this is a bit of a shit hole’. (A very lovely, wonderfully located shit hole that I adore, but a shit hole nonetheless)
The idea just dropped into my lap one day when I was chatting to Helen (from The Creative Business Network – you probably know by now that we work together a lot since I bang on about her A LOT) and I said ‘I’d kill for a leopard print wall but that’s never going to happen’…. Thankfully, Helen is a doer.
Hello Leopard Print
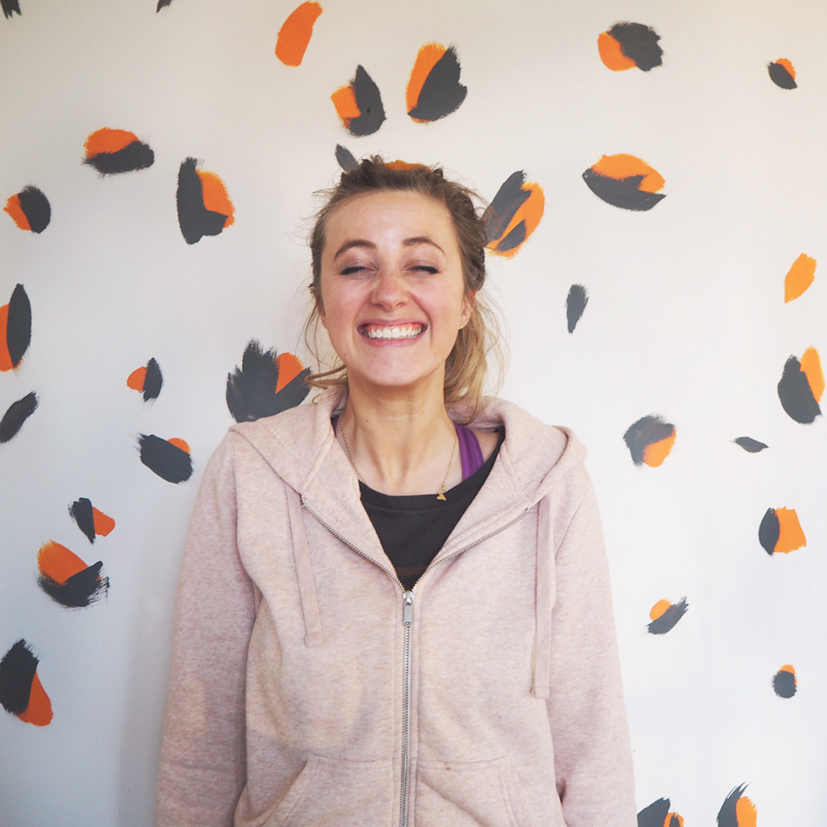
Painting a wall leopard print is honestly the greatest decision I’ve ever made. I can’t tell you how happy it makes me. I probably spend abut 5 minutes a day just staring at it, I’m 100% that emoji with the heart eyes (and the cup of tea emoji too) The other great thing about it was how EASY PEASY it was to do! I’ve had a lot of love for and questions about the wall so wanted to do a How-To post so that we can all leopard print our walls. (Please do tag me in any pictures in you do it as I’d LOVE to see and share them!)
I knew I wanted it to be a gentle pink base with orange spots and dark grey edges (I still don’t know what they’re called – the bits around the spots so for this I’m going with ‘edges’) I thought those colours would keep it kind of ‘traditional but with a twist’ which was perfect for me (like, the entire essence of my business)… I bought a few tester pots of pink and settled on Dulux ‘Blush Pink’ as I wanted something really subtle and not ‘too pink’ and this ticked those boxes. I’d already settled on it when Dulux got in touch and very kindly offered to gift me the paint. I asked for a pot of Blush Pink for the background then I chose the incredible ‘Orange Fizz’ and ‘Bowler Hat’ for the spots…. I used a really small amount of the spot colours so if you’re doing it at home I think you could likely get away with a tester pot for each of them.

How To: Leopard Print Wall Of Dreams
Step 1: Base Colour
So I painted the Blush Pink base a few days in advance (I wasn’t sure if it was ‘too pink’ for a little while – everything else in the room is a touch old and grubby so it kind of enhanced the grub around it but as soon as we did the spots it changed everything so if you’re doing it and you’re unsure of the background colour originally I’d just say hang in there! The spots kind of take all the attention and you don’t really notice the background that much afterwards)
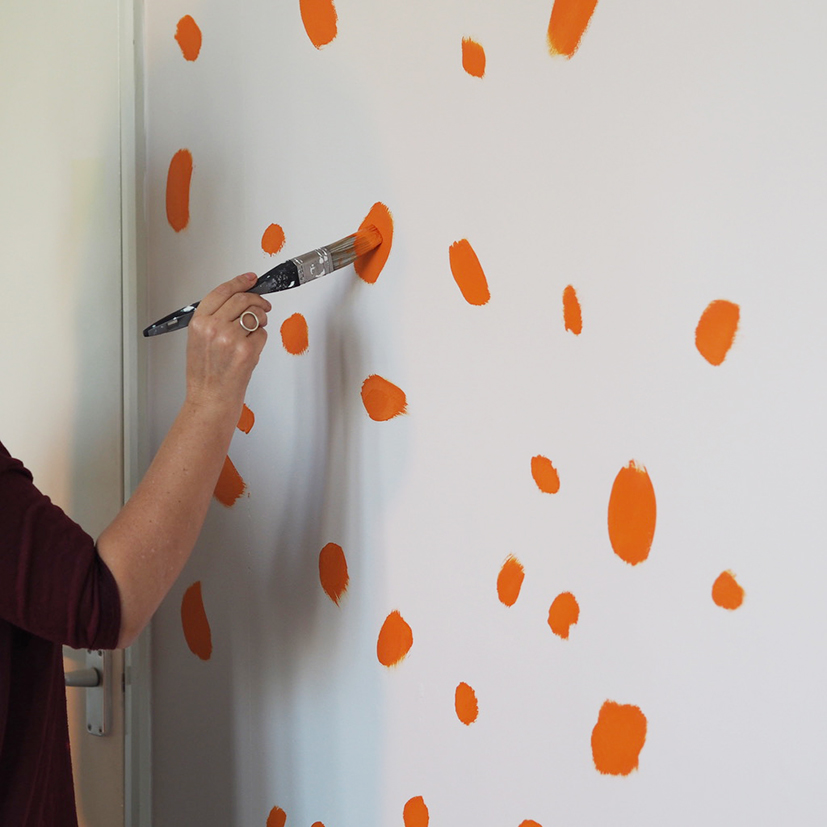
Step 2: Orange Spots
Helen and I painted the spots together, there’s a video below and it is honestly as easy as it looks. We used quite large, round brushes and with a ‘brush stroke’ action (not a jab/spot) starting with the Orange Fizz. We worked from the bottom up and because there was two of us doing it we kept swapping sides just in case we did them differently, in order to mix it up rather than being half a wall in one style and the other half another.
We tried not to make it too cluttered and left some spaces, knowing that we could fill them in later if we wanted, and just did it quite sporadically, stepping back often to see how it was looking.
Step 3: Grey Edges
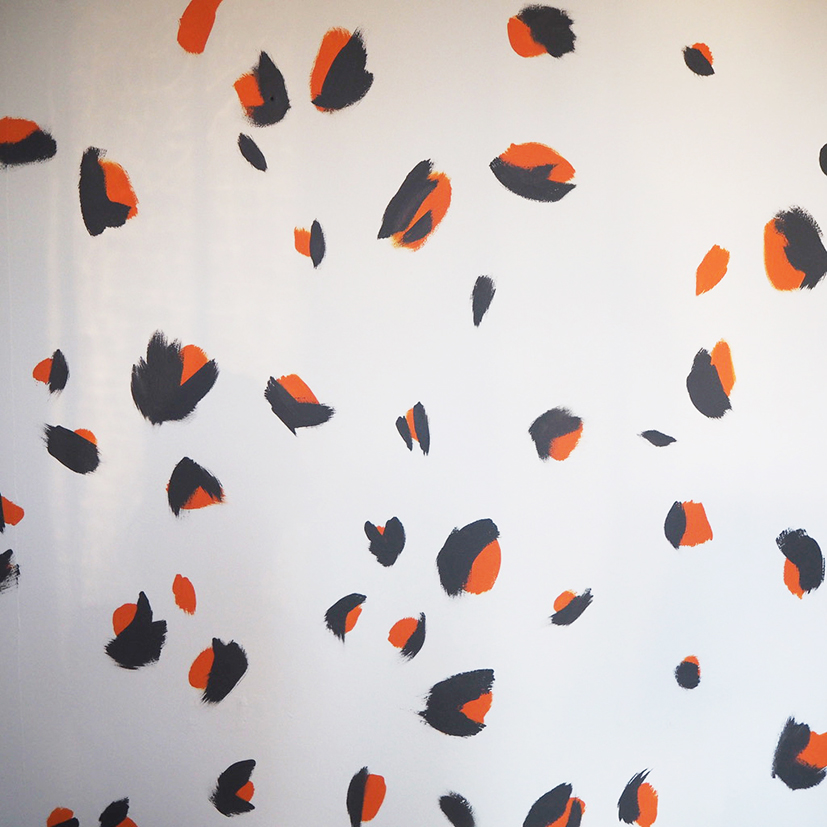
We then waiting about an hour for it to dry (make sure it’s properly dry so it doesn’t blend!) and then we painted the Bowler Hat Grey on top. We used similar sized brushes but straight bristled (rather than round) although to be honest I don’t think it made much of a difference. You could probably use any brush as long as it’s not tiny. Again, we kept stepping back to see how it was looking.
With the Grey we overlapped the orange rather than leaving a gap between the two colours. We put more of the grey on some spots than others. Some we painted two strokes of grey in a sidewards V shape and others we just did one curved stroke running around the orange dot and on a few we did two off-parallel (if that’s a thing?) lines either side of the orange dot.
Step 4: Touch ups
We then went back with just one colour to make small dashes of either orange or grey (we overdid it slightly so at the end touched it up by simply painting the background colour over them – it’s almost impossible to see them now.
And that’s it!
Written down it looks a lot more long winded that it actually is, really – you’re just slapping a bit of paint on a wall in random dashes, if you over do it you can paint over it, if you under do it, you can add more. So I reckon you should just go for it!
Video
Here’s the video to show how we did it (I hadn’t really planned to do it like this so it’s a bit random but hopefully it works haha!)..
What do you think?
I REALLY hope you like it as much as we do. I’m honestly obsessed with it and since we got all the new furniture in I just LOVE being in the studio, I feel so lucky that I get to work there (not sure the landlord will agree when he comes in to inspect the place! they didn’t even want me to paint the door grey, how’s a leopard print wall going to go down I wander? ;p ) Anyway, I best be off, I hope you love it and remember, if you do one yourself please tag me so I can admire it with you!
I can’t wait to show you what else we’ve done in there, next week will be a big update on the rest of the room with before and after pictures…I’m so excited!
Take Care Pals,
L x
P.S Yes the new leopard print cushion was 100% a result of the wall! haha! (More on that in a few weeks time!)