

 (1)")


Hello pals! How on earth are you? It’s been a gloriously rainy day here which I have absolutely loved. It’s a knitting on the sofa kind of day – which has been perfect as that was on my to-do list (new patterns, HELLO!)
Since it’s been such a great day for knitting I thought I’d do a knitty blog that’s been on my list for a little while… How to read a knitting pattern. Now, all brands write knitting patterns differently and some are easier to understand than others (I try to keep ours as readable as possible and am delighted whenever we get positive feedback or reviews saying how easy they are to understand) so today I am only running through how to read a LAD knitting pattern (what others would you possibly need anyway? 😜😜😜)
How do you know if a knitting pattern is for you?
Lets start before you’ve even downloaded the pattern, how do you know if it’s one for you? So first of all, the pictures should help. If you view our website on a computer then you can filter by level so you can choose to only see beginner knitting patterns for instance.
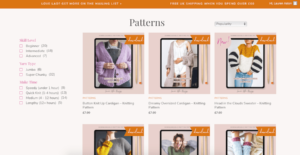
Immediately this is a great way to narrow down your selection, however, if you’re on a mobile fear not, you can click on any knitting pattern that catches your eye and check the information on the listing. If you scroll down past the product description there are different tabs, the main ones you’ll need are:
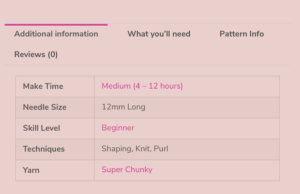
Additional Information: this includes information on the make time (roughly how many hours to make this project), needle size (what size knitting needles you’ll need to knit it up), skill level (what ability we class the pattern as ie beginner, intermediate or advanced), techniques (a brief outline of what knitting techniques are used in the pattern) & yarn (what LAD yarn you’ll need to knit the pattern)
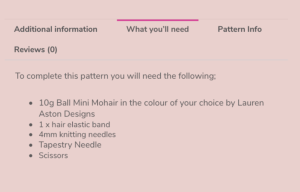
What You’ll Need: This tab is on all our knitting pattern listings, it tells you all the materials you’ll need to make the pattern, it includes the amount of yarn you’ll require as well.
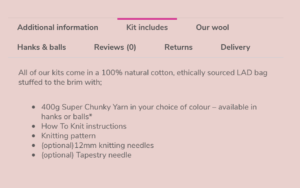
Kit Includes: this tab is on all our knit kit listings, it’s basically the kit version of ‘What You’ll Need’ only in a knit kit you don’t have to find it all yourself as it’s included. Some bits say “(Optional)” and these are only included in the kit if you tick the box for them… These are things like knitting needles as you might already have them.
These tabs plus the description should tell you everything you need to know to decide if a pattern is for you – if you’re new to knitting and a pattern is marked as advanced and lists heaps of scary-sounding techniques I’d say take a step back and see if there are any others you like that are for beginners. If you find a beginner one you like the look of (it’s pretty likely you’ll be fine if it’s marked beginner) we note all the techniques so that you can head to our knitting knowledge page and learn them there… I have to say though, it’s much easier to understand – even when watching ‘how to’ videos – once you have some knitting in front of you and you can try along with the videos. Sometimes just watching makes it seem scarier than it is…(does that make any sense?)
Before You Start
Assuming you’ve now got a knitting pattern and you’re ready to begin…
Our patterns always have a bunch of information at the top and funnily enough, this waffle is important, as much as you want to skip to the bit where you pick up the needles and get cracking. It seems a bit boring so I will whizz through it… (Some of it is repeated from the product listing, mainly because it’s necessary to have it on but also because – and this won’t come as a shock to anyone else in e-commerce…. No one reads the sodding product description 😂😂🙈)
All of our patterns include the following information:
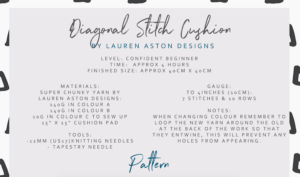
Level: this is the skill level of the pattern ie beginner, intermediate, advanced
Time: the approximate time it takes to knit the pattern (this can differ greatly as some people are much faster than others for instance when you’re starting out you’re often slower)
Materials: this will always be Lauren Aston Designs Yarn on our patterns but will specify whether it’s our Super Chunky Yarn, Jumbo, Giant or Mini Mohair … It will also tell you how much yarn you need. Again this is a slight estimate (based on a lot of pattern testing and experience) but everyone knits differently so this is subject to slight change, we try to overestimate slightly so you’re not buying heaps you don’t need but you should certainly have enough.
Tools: generally this is knitting needles you’ll need for the pattern but will include anything else such as buttons if that’s relevant.
Gauge: the gauge is how many stitches you should have to 10cm x 10cm of knitting (with the yarn and tools for that pattern) we went into lots more detail on tension and gauge in a recent blog post and I definitely recommend giving it a read if you’ve got the brain space left after this.
Finished size: you guessed it! This is the approximate finished size of your knit. If you’re making something which has multiple size options such as a jumper it’ll be broken down by each size (small, medium, etc) again all of the sizes are approximate and my TOP TIP for sizing and choosing your size is always to measure an existing jumper you have that you like the fit of and see which size it fits with. (The sizes are also mentioned in the product listing so you’ll always have access to this information before you purchase a pattern or kit which can help you decide before you invest.)
Notes: Some of our patterns contain a ‘notes’ section. This tends to be any hints or tips I have, perhaps things that aren’t required to knit the pattern but that help you to understand. The Sock It To Me Lounge Sock pattern for instance has a note about how to knit them for different sized feet whereas the Scrunch Me Scrunchie pattern I just had a little chat really!
Abbreviations in Knitting Patterns
I think the thing about knitting patterns that scares new knitters the most is abbreviations.
Abbreviations are basically the shorthand of knitting, like a code that you learn and theoretically, it makes patterns easier to follow. Generally, abbreviations are simple to guess once you know what type of thing you’re looking for, so, for instance, the 2 main knit stitches are ‘Knit’ and ‘Purl’ and their abbreviations are ‘K’ & ‘P’…. not too hard to crack that code! But it certainly can seem a bit intimidating when you see a pattern for the first time and it says something like ‘K5, K2tog, K1’… It looks like another language and it’s really easy for our brains to just say ‘no thank you, looks hard, bye!’ …but fear not, that’s what this blog is for! Let’s talk it through and make it easy.
The knitting knowledge section on the website has a page for abbreviations (having just linked to it I think we could add a little more information to it so I’ve added that to my to-do list) but I’m going to run through the main ones for beginners. Where relevant, these also have a dedicated page on our Knitting Knowledge section so that you can learn how to do it (I’ve linked to them).
Here’s a quick list of popular abbreviations and then we’ll break them down below….
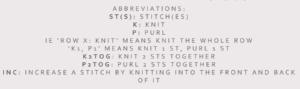
K = Knit
P= Purl
K2TOG = Knit 2 stitches together
[Square Brackets] = anything inside square brackets is to be repeated
STS = Stitches
K1, P1
So we already know that K = Knit and P = Purl so when would we use that?
These are basically the only stitches you ever need in knitting you just combine them in a few ways to make the knitting look different…we’ll delve into that properly another day. So here are a few abbreviations you might see and what they mean…
K1 = We know the K means Knit, and the number behind it is telling you how many stitches to knit. So P5 would mean you purl 5 stitches, K9…. yes you know it.. knit 9 stitches. That bit’s simple!
[K1, P1] = This would be Knit 1 stitch then purl 1 stitch and because it’s in square brackets we know (from looking at our abbreviation list above) that that means it’s to be repeated, so you’ll: knit 1 stitch, purl 1 stitch, knit 1 stitch, purl 1 stitch, knit 1….. and so on. After the brackets the pattern will tell you how many times to repeat the instruction, so it might say ‘[K1, P1] 3 times’… this would cover 6 stitches (3 knits and 3 purls alternated) it might say ‘[K1, P1] to end of row’ so you’ll just keep repeating it until you get to the end of your row.
All the instructions for stitches on one row are broken down by a comma, so if you have 18 stitches and your knitting pattern says ‘Row 1: K5, P6, K7’ you’ll knit the first 5 stitches, purl the next 6 and knit the next 7… you will always have instructions for all the stitches on your needles so the pattern will tell you what to do with each stitch.
Row 1: Knit = Because the row isn’t broken down stitch by stitch, this would mean that you knit all the stitches on that row. in our patterns, I tend to write the word ‘knit’ in this case (rather than ‘K’) simply because I think it looks better and makes sense.
The abbreviations we include in each knitting pattern changes based on what will be relevant to the pattern (we only include abbreviations used within that pattern specifically) and the ability level of the pattern – for instance I assume knitters making advanced patterns will understand basic abbreviations like ‘k1’ so I don’t always include them. A knitting pattern for beginners, particularly those designed for absolute beginners (like the Simple Scarf or Snood kits and the Head In The Clouds Sweater patterns) will generally have lots of abbreviations broken down as I like to think these patterns are good starting points for people to really learn the basics. Some, like the new ‘Scrunch Me Scrunchie’ knit kit don’t include any abbreviations because I wrote the pattern within any to make it even more simple…. there is a method to the madness but I will admit it’s been a learning curve!
Reading a Knitting Pattern
So as you may have gathered, most of the work in understanding the pattern is done before you even begin knitting. Once you get that far you basically have all the tools you need to knit and you just need to go line by line. There are just a few last things to note…
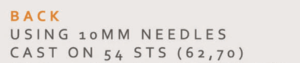
How sizes are shown on a pattern: If you’re knitting an item with multiple size options like a jumper that can be knit in Small, Medium or Large the sizes are broken down within the pattern. The sizes will be shown as ‘S (M, L) ….. The clearest example of this is probably the cast on, here’s an example:
‘Cast on 40 (50, 60) STS’ …this would mean that if you’re knitting the small size you cast on 40 stitches, if you’re knitting the medium size you cast on 50 stitches and if you are knitting the large size you cast on 60 stitches.
The sizes will be shown throughout the knitting pattern in this way, if you’re following the medium you will ALWAYS look at the stitches in the middle – the first ones in the brackets.
What are the numbers in brackets at the end?
This is a question I get quite a lot from beginner knitters as some patterns have numbers at the end of some rows. for instance…
Row 5: P9
Row 6: K7, K2tog (8)
The number at the end – in this case, the number 8 at the end of row 6 – tells you how many stitches you should now have in total. This information is normally included if you are increasing and/or decreasing your stitches, it’s just a way of checking you’re work against the pattern. In this case, row 5 had 9 stitches and row 6 we knit 2 of them together so we’re left with 8 stitches.
The only times it’s slightly more complicated is on a knitting pattern with multiple sizes (like we discussed above) but the stitch count will still be shown in the same order. (S, M, L)
![]()
OK, I think that might be enough information to make any new knitters feel like their brains are full so I’m going to leave you now. Plus I’ve got some pattern writing to do, now you’ll be able to understand what they mean if you didn’t before YAY!
I hope that helps!
Take care,
L x